

How To Adjust Screen Timeout Windows 7
Past default, Windows 10 lock screen automatically turns off after you've been inactive for over a minute. This is called a timeout, and it's implemented to save power and battery life, nevertheless, some users may be looking to spend more or even less fourth dimension with the lock screen active
This is something that tin exist changed quite easily and quickly. All you lot have to do is read our article and follow the steps described beneath. Yous'll be able to modify or disable the lock screen timeout within minutes!
What is the lock screen timeout?
In Windows 10 , the lock screen has become quite avant-garde and a lot more than useful as well. It displays the current time and date, all available local users, and fifty-fifty gives you the pick to use Cortana and other Windows utilities. You may too choose to restart or shut down your device straight from the lock screen itself.
With more functionality, more people are looking to extend the amount of time the lock screen remains visible even while the reckoner is inactive. This can be used to have access to Cortana, brandish the fourth dimension and date with the cute background images, or but liven upward the atmosphere instead of showing a black screen.
To exist able to achieve this, you need to configure the lock screen timeout . By doing that, you're able to give instructions to Windows x to not turn your screen off. Information technology'll stay shown fifty-fifty if the device is on the lock screen and doesn't receive input for an extended amount of time.
Guide to change or disable the lock screen timeout
In that location are multiple means to go about changing or disabling the lock screen timeout in Windows 10. All of these steps are piece of cake to follow, nevertheless, some of them require a flake more time than the others. Exercise what feels good for you — y'all can e'er return to our commodity and endeavour something else in the time to come.
Tip : All of these methods can be performed by everyone, as our guides are piece of cake to follow and don't require whatever previous Windows ten experience. If y'all know anyone who'south experiencing problems with their system, don't forget to recommend us!
Now, let's start learning nigh disabling or modifying the lock screen timeout using a Windows 10 operating system.
Method 1: Manually make changes to the Registry and modify the lock screen timeout
The very start thing nosotros recommend trying is making changes to the Registry . Here'due south where you tin can detect Windows' more advanced settings, often not available elsewhere.
While the Registry seems intimidating at offset, information technology's really quite uncomplicated to navigate. All y'all have to keep in mind is to not brand any un-instructed changes. A poorly configured Registry may atomic number 82 to errors on your device!
Warning : Before beginning this guide, we recommend creating a backup of your Registry. If yous're not sure how to create and import Registry backups, watch " Registry Backup, Restore, Import And Export " from Windows Ninja.
Let'south become started!
- Printing the Windows + R keys on your keyboard at the same time to bring up the Run awarding. Here, just type in " Regedit " and click OK .
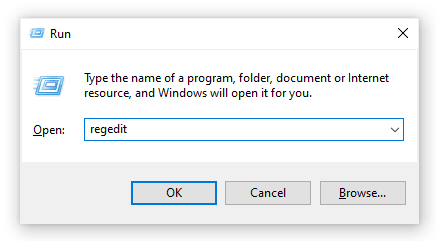
- Navigate the Registry Editor using the arrow icons next to each folder name on the left-side panel. Navigate to the following registry fundamental: HKEYLOCAL_MACHINE\SYSTEM\CurrentControlSet\Control\Power\PowerSettings\7516b95f-f776-4464-8c53-06167f40cc99\8EC4B3A5-6868-48c2-BE75-4F3044BE88A7
- Double-click on the " Attributes " key seen in the right side of the window.
- Alter the value data to ii , then click the OK button. Make sure not to make any other changes!

- Now, you should exist able to see the lock screen timeout option when making changes to your Power Options (jump to Method four ).
Method 2: Download the automatic Registry changes
Non confident in using the Registry yourself? No trouble! Y'all can merely apply a one-click solution to brand the modifications automatically without having to worry almost messing something up.
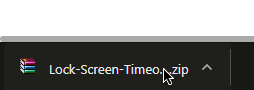
- Click here to download the " Lock Screen Timeout Hacks " file from HowTo Geek. This is a .zip file, significant that yous might need to download an application such as WinRAR or vii-Goose egg to access the contents.
- Open the file you lot only downloaded.
- Locate " Add Lock Screen Timeout Setting to Ability Options " and double-click on it to launch information technology.

- Now, you lot should be able to meet the lock screen timeout option when making changes to your Power Options (jump to Method 4 ).
Method 3: Enter a control using Command Prompt to alter the lock screen timeout
Another powerful tool used to make more advanced changes and personalization to your device is the Command Prompt. It allows you to directly give commands to your computer via a lawmaking language. We can apply this to make changes to the Power Options, allowing you lot to modify the lock screen timeout.
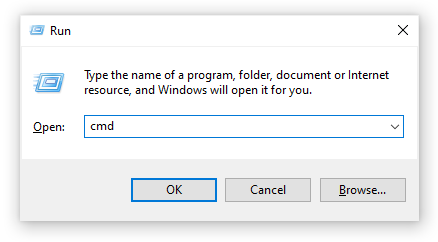
- Printing the Windows + R keys on your keyboard to open the Run utility. Blazon in " cmd " and press Ctrl + Shift + Enter to launch the Command Prompt with authoritative permissions.
- When the Control Prompt launches, input the following command and press Enter : powercfg.exe /SETACVALUEINDEX SCHEME_CURRENT SUB_VIDEO VIDEOCONLOCK 60.
Make certain to change " sixty " to the amount of time yous desire your lock screen to stay agile for. This fourth dimension is in seconds, pregnant that by leaving it default, you'll have 60 seconds before the lock screen goes into a timeout.
- Side by side, input the following command and press Enter once again: powercfg.exe /SETACTIVE SCHEME_CURRENT
- Close the Command Prompt. Y'all should be able to notice that the lock screen timeout has inverse.
Method 4: Employ the Power Options to change the lock screen timeout
After enabling the setting with either Method one or Method ii , you'll be able to apply the Ability Options to modify the lock screen timeout. This is what you lot demand to do:
- Printing the Windows + R keys using your keyboard to bring up the Run utility, then type in " control " and click the OK button. This is going to open the Command Panel.

- Make certain that your view manner is set to Category . This will allow you to meet grouped settings, making navigation easier.

- Next, click on the Hardware and Audio heading.

- You should see another listing of groups full of dissimilar settings. What you need to click on is the Power Options menu.

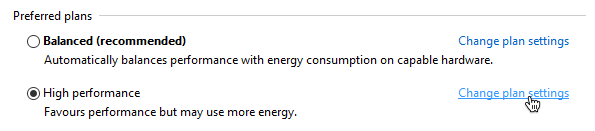
- Click on the " Change program settings " link next to whichever program you're using. There's no need to alter your bodily programme — all we'll practise is simply change it.
- Click on the " Change advanced ability settings " link at the bottom of the page. A new window should pop up.

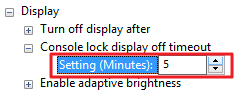
- Scroll down until you encounter Display , then click on the plus icon to aggrandize the section.
- Alter " Console lock display off timeout " to the number of minutes you want earlier your lock screen goes into a timeout. If you don't see this setting, make sure to follow the steps in either Method 1 or Method 2 .
- Click the Apply button, then close the window by clicking OK .
- Yous should be able to run into that your lock screen timeout has been increased or decreased.
We hope that this article was able to help you learn how yous can change the lock screen time out, or disable it entirely. Get more control over your device and enjoy your lock screen active for exactly as much time as you want information technology to!
Are you lot interested in learning more nigh Windows 10? Do you need help fixing whatsoever other Windows 10 errors and issues? You can browse our defended blog section and find articles about everything related to Microsoft's groundbreaking operating system. Click hither to go along .
Source: https://softwarekeep.com/help-center/how-to-change-or-disable-the-lock-screen-timeout-on-windows-10
Posted by: brewerburs1944.blogspot.com
0 Response to "How To Adjust Screen Timeout Windows 7"
Post a Comment